Salesforce Workflow Rules: Salesforce has long been a leader in customer relationship management (CRM), providing many features and tools to optimize business operations. Workflow Rules are a crucial component that can help automate and optimize repetitive activities, improve user productivity, and guarantee data accuracy. This extensive blog post dissects Salesforce Workflow Rules, examining their essential elements, applications, best practices, and ways companies may utilize them to improve operational efficiency.
Workflow rules are a workflow automation or business process management software feature that lets organizations automate and streamline processes by defining actions or stages in response to specific circumstances or triggers.
Workflow rules allow businesses to define precise guidelines and standards that dictate how tasks or data move through their system. Once established, these rules can be set up to carry out tasks, assign assignments, update records, send messages, or automatically start approval processes based on predetermined criteria.
Learn everything there is to know about the Salesforce Automation System!
Workflow rules help businesses automate and streamline their operations to boost productivity and reduce human labour.
By establishing guidelines to control workflow procedures, they can guarantee compliance, maintain uniformity, and do away with the need for manual intervention for mundane chores.
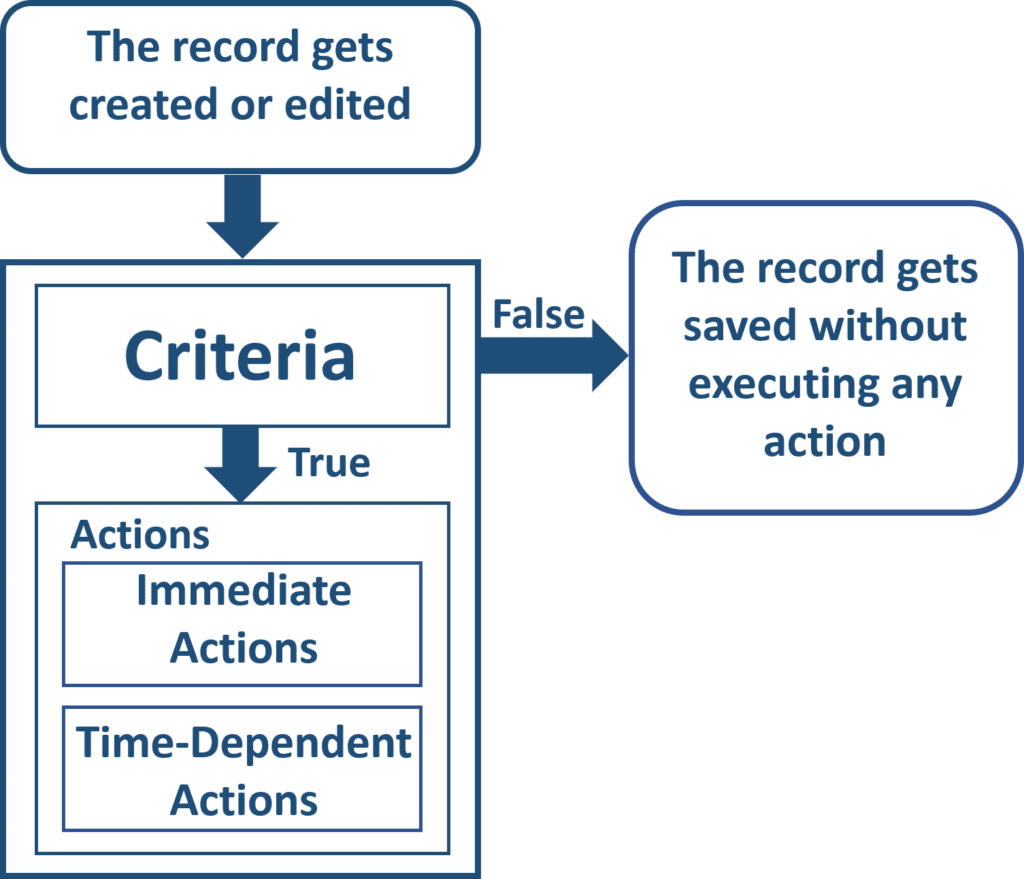
The fundamental format of a Salesforce workflow rule is as follows:
Components of Workflow in Salesforce
There are two primary parts to Salesforce workflow rules:
Conditions that must be met to test a record are known as criteria. For those with a technical background, for instance, the meaning of criteria in a workflow is represented by the if statement in an if/then condition.
After a record satisfies the requirements, actions take place. Once more, the meaning of an action in the workflow is determined by the then statement in the if/then condition.
Types of actions present in a workflow in Salesforce
- Quick actions: actions that are carried out right away upon the creation or editing of a record
- Actions that depend on time: Actions that occur after a predetermined amount of time say ten days, but before the record closes. Following this time frame, Salesforce workflow rules will reassess the record to ensure the rule’s requirements are satisfied. The related actions will be carried out if the record satisfies the requirements.
The following actions take place each time a record is created or edited:
A specific workflow rule’s criteria now in effect on that object are assessed.
True: The actions connected to that specific workflow rule are indeed carried out.
False: No action is taken; the records are saved automatically.
Therefore, actions based on certain criteria can be automated using Salesforce workflow rules. When a record is created or modified, it can start an action.
Types of evaluation criteria
Created: The action is carried out whenever a record is made, and the record meets the criteria.
Created and edited it: The action will occur when a record is created or changed.
Created and then modified each time to satisfy the following requirements:
- The action will be carried out whenever a record is produced and meets the requirements. Consequently, the action won’t be taken if the record is edited and no longer satisfies the requirements.
- Let’s say that after being produced, the record is changed or modified to satisfy the requirements. If it still fits the requirements after another evaluation, the action will be carried out. It won’t be performed if not.
Salesforce workflow rules support n number of actions at once. Workflow rules in Salesforce can be used to initiate the following actions:
- Giving someone a task to do
- Carrying out a field update
- Transmitting an electronic message
- Transmitting a message externally
How to Configure Workflow Rule Criteria?
By now, you know the basics of workflow rules in Salesforce. You will now be able to set up the criteria for workflow rules.
The screen that appears after you log into your Salesforce account is as follows:
Step 1: The left side of the screen will display a menu. To discover Process Automation, scroll below. Locate and click on Workflow Rules under this section.

Step 2: As seen in the illustration below, click New Rule on the new screen to establish a new workflow rule:

Step 3: At this point, you must choose an object. Any object is available for selection from the drop-down menu. Select Lead as the object to practice.

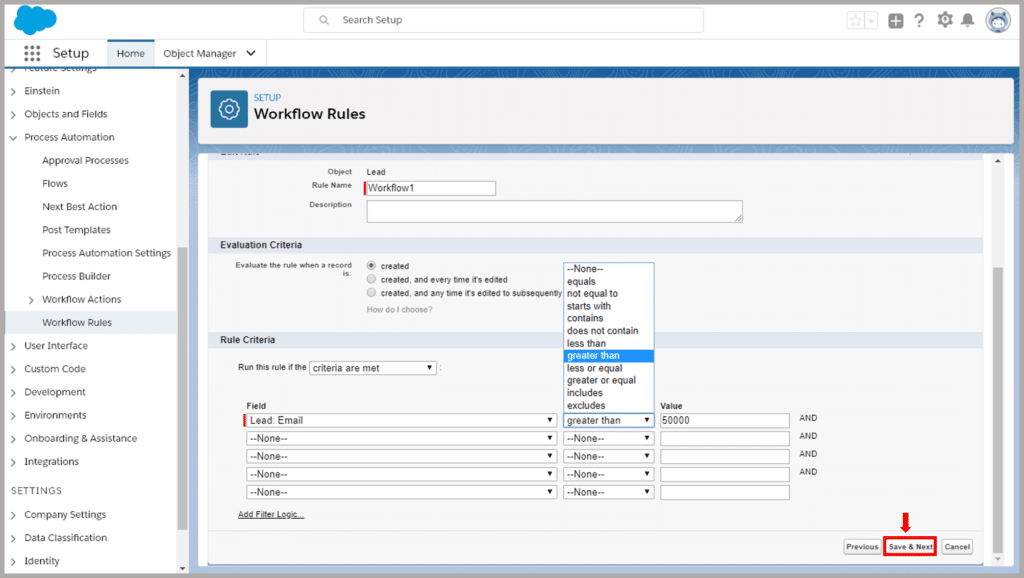
Stage 4: The Workflow Rule configuration is done in this stage. You must enter the following information to achieve this:
Editing Guidelines: Type the Rule Name here.
Criteria for Evaluation: Select the necessary Assessment Criteria.
Regulation Requirements: Choose the conditions that match from the first drop-down menu. Choose the necessary field parameters in the Field section. Investigate the various Field Types based on your preferences.
Next, select Save & Next.
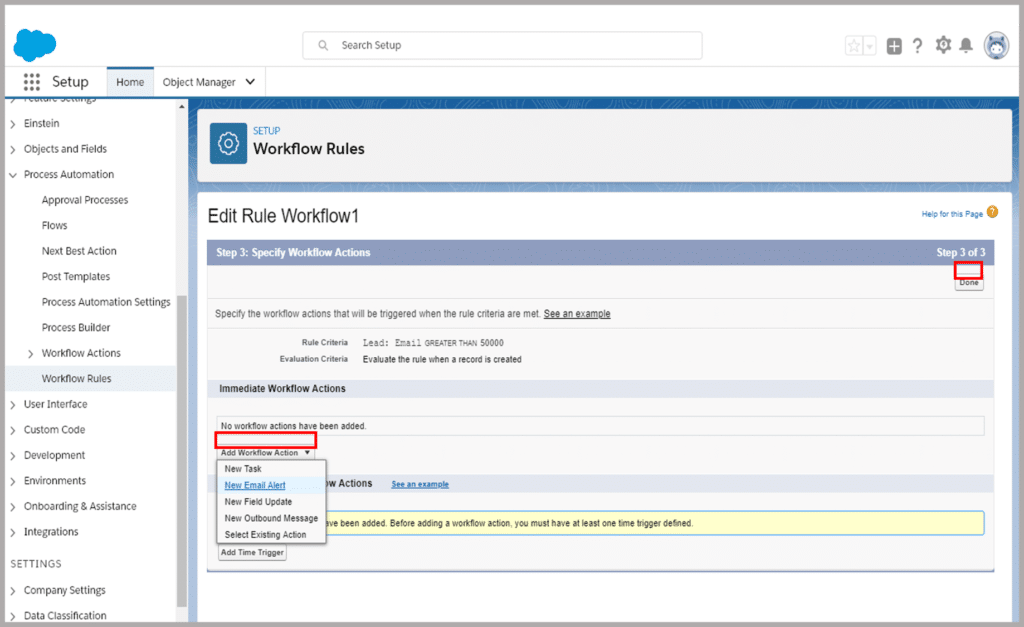
Step 5: A Workflow Action must be added in this step. Click on Done after choosing the desired action (in this case, New Email Alert) from the drop-down menu.
Step 6: You will establish an email alert in this step. You must complete the following details to do so:
- Description: This textbox needs to have the subject line of the email.
- Distinguished Name: This will automatically show up based on your description.
- Email Layout: Example An email template is a text template that will be included in emails. You have two options: make your email template or select one of the pre-made ones. To accomplish this, click the magnifying symbol next to the textbox.
- Recipients: Decide who should receive the mail and who should receive it.

Step 7: Afterward, select Done on the screen that preserves your current work.
Step 8: At this point, click Activate to make the workflow rule active. Choose Lead or the name of the item you created from the list by clicking the Add button. To create a Salesforce record, click New. Following your click on New, the screen below will show up. After filling out all the required information, click Save. Following saving, a screen confirming the data will appear. You will receive a confirmation email as well.
Step 9: The Time Trigger will be attempted to be added in this phase. To do so:
Navigate to the Workflow Rule page and select Edit.
Click Edit after deactivating the workflow rule.
Click Add Time Tigger now.
Click Save after choosing how many days, months, or years you want the action to take effect.

Step 10: Assemble the email alert using the previous creation. Select “Activate” by clicking. You’ve successfully created your workflow rule!
I hope you now have a thorough understanding of what Salesforce workflow is and how to utilize it as we near the end of this portion of the Salesforce Tutorial on Workflow in Salesforce.
Conclusion
Salesforce Workflow Rules are evidence of the platform’s dedication to enabling organizations via efficiency and automation. Learning Workflow Rules becomes essential as firms traverse the complexity of contemporary business processes.
By comprehending the constituent parts, investigating varied applications, adhering to optimal methodologies, and learning about sophisticated approaches, enterprises may fully leverage Salesforce Workflow Rules to augment efficiency, improve correspondence, and raise their CRM encounter.
For companies looking to prosper in the current competitive environment, delving deeply into the world of Salesforce Workflow Rules is a necessary first step toward efficiency.