As we move further on our journey of Data Modelling, we come across Validation Rules in Salesforce. It is quite obvious that users could enter any data type across various records on the system. But, we need to check and validate the accuracy to avoid errors in the later stages. Hence, it becomes necessary to learn about the same, especially the use of Validation Rules. There are a total of 5 rules in Salesforce,
- Validation Rules
- Auto-Response Rules
- Assignment Rules
- Escalation Rules
- Workflow Rule
Each one of them has a different function and performs accordingly. However, our main focus in this tutorial will be on Validation Rules in Salesforce. Make sure to read the blog till the end and learn basic concepts related to the topic.
What are Validation Rules in Salesforce?
Let us start by getting familiar with the term ‘Validation.’ The literal meaning stands “the action of checking accuracy” of data or records. Similarly, Validation rules refer to a set of instructions or orders that verifies the overall standards. In Salesforce, we define some cases that determine whether the user’s data is correct or not. Moreover, it might be a combination of expression or mathematical formulas. The basic idea behind the same is to avoid saving incorrect information in the main data frame.
The validation rules will return a “TRUE” value if input data from users satisfies all the conditions. On the contrary, we will receive a “FALSE” value if the evaluation fails in any case. Further, you can specify an error message to display on the screen in such situations. It is quite important as you want quality data irrespective of the wrong inputs from the user.
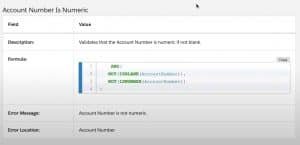
For instance, you want to collect data of user’s phone numbers or their Postal Address PIN in a specific format. If any user enters the wrong data by mistake, the Validation rule will return FALSE, and the error message will pop. Thus, he can correct the details and try again to provide accurate data.
How to Create Validation Rules in Salesforce?
Now, we will learn about the steps that will help you to create Validation rules in Salesforce. The steps for the same are,
- Click on the Setup page and select Object Manager
- Go to the Account section and click on the Validation Rules from the list on the left side
- Tap on the New
- Fill in the appropriate conditions of your validation rule as
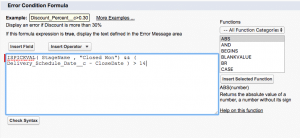
- i) Rule Name:
- ii) Error Condition Expression
- You can save the formula or test it through the Check Syntax
Conclusion
We hope you know the basics of validation rules in Salesforce and their usage environment. Our team will be coming with more educational blogs for you. Hence, stay tuned with us!
If you want to learn more about it, we have a special course about
Salesforce Platform App Builder Certification.
Do check it out as you will get EXTRA DISCOUNT!!


