Create Email Templates in Salesforce: Sending emails to hundreds of recipients, subscribers, and customers would be a huge task without email templates. Luckily, marketers can create an email, save it as a template, and use it again in different campaigns.
In this guide, we’ll show you how to create an email template in Salesforce Lightning Experience. Let’s get started!
Table of Contents
ToggleLimitations Of Salesforce Templates
Before we get into the details, it’s important to know that Salesforce email templates aren’t perfect. They have these limitations:
- The number of email templates you can create depends on your Salesforce account/version.
- The size of attachments and images also depends on the Salesforce version.
- The Salesforce version determines how many merge fields you can use in each email template.
- The platform edition sets the character limit for the email body, subject line, and more.
- HTML templates in Salesforce may have formatting limits to improve security.
- Salesforce offers customization options for email design, but for very complex templates, you might want to use specialized design platforms.
- Due to limits in showing dynamic content, you can’t enable advanced personalization in Salesforce.
We’re listing these limitations to help marketers keep their email marketing expectations in check when using Salesforce. You need to adjust your strategy to fit the system to get the best results.
With that said, let’s get into the details of creating email templates in Salesforce Lightning Experience.
Steps To Enable Salesforce Lightning Email Templates
To help all types of Salesforce users, we’re starting from the beginning. If you already know how to enable Lightning email templates, you can skip this section.
Enabling Lightning templates has two parts. First, let’s learn how to enable Template Folder sharing so multiple users can share templates. This step makes it easy to create and use reusable email templates in Salesforce Marketing Cloud.
1. Template Folder Sharing In Salesforce
Here’s how to do it in simple steps:
- Log in to your Salesforce account.
- Go to Setup and type “Lightning Email Templates” in the search box. (If you’re using Lightning Experience, click the gear icon in the top-right corner first.)
- Next, turn on the Folders and Enhanced Sharing option.
2. Enabling Content Builder In Salesforce
To enable Content Builder, follow these easy steps:
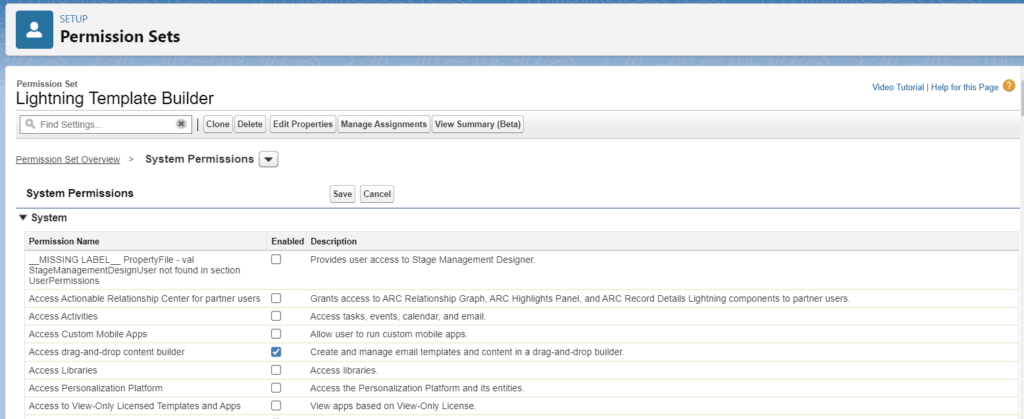
- Search for “Permissions” in the search box. Create a new Permission Set.
- Scroll down and find “System Permissions” at the bottom of the screen.
- Select “Access drag-and-drop content builder,” then click Save.


Creating Email Templates In Salesforce Lightning
Here are the steps to create email templates in Salesforce Lightning Experience:
- Open the App Launcher and look for “Templates” in the menu.
- Select “Email Templates” and click on “New Email Template” in the upper-right corner.
- Fill out the necessary fields in the dialog box that appears.
- After filling out the fields, click “Save.”
- Look for the “Edit in Builder” option, as seen in the screenshot. If you don’t see it, the new setting may not have been updated yet.
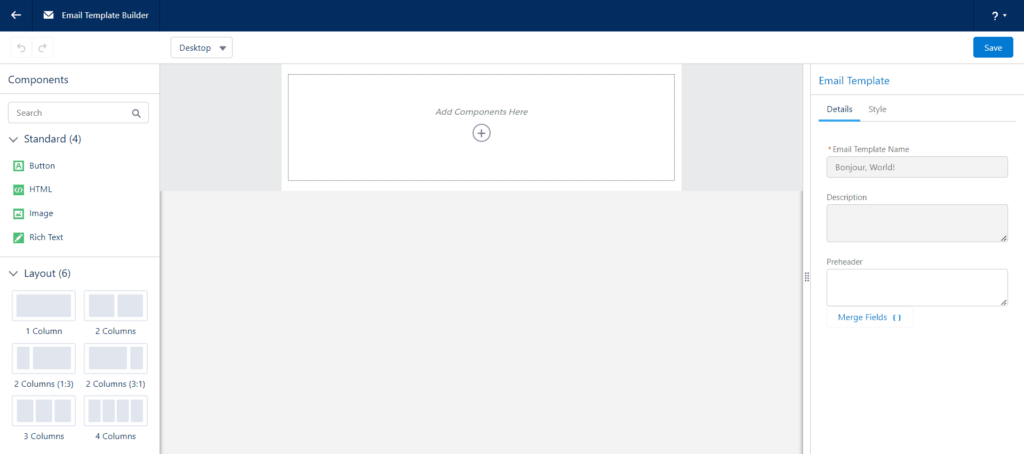
- Click on “Edit in Builder.” You’ll then see the Template Builder, where you can make all your changes and edits.


In the previous section, we explained how to activate the Content Builder. On the left side of the Email Template builder, you’ll find all the drag-and-drop components. On the right side, you can edit the details of each component.
If you’re using Salesforce Sandbox, you might not see the “Edit in Builder” option. It’s advised not to create a new Permission Set in the Sandbox. Instead, select from the pre-existing Permission Set labels and then go to System Permissions.
Now you’re ready to create your first email template in Salesforce Lightning Experience. When you’ve finished designing your template, simply click “Save” in the upper-right corner, and you’re good to go!

What are some of the best practices for Salesforce email templates?
Now you know how to make an email template in Salesforce. However, without a strategic plan to support your marketing goals, you can’t fully maximize the use of email.
· Keep it Simple: Design templates that are easy to read and navigate.
· Mobile-Friendly: Ensure templates look good and function well on mobile devices.
· Personalization: Use merge fields to personalize emails with recipient information.
· Clear Call to Action (CTA): Include a prominent and clear CTA for recipients to take action.
· Consistent Branding: Maintain consistent branding elements like colors, logos, and fonts.
· Testing: Test templates across different email clients and devices to ensure compatibility.
· Compliance: Ensure templates comply with email marketing laws and regulations.
· Analytics: Use Salesforce analytics to track template performance and optimize for better results.
Conclusion
We’ve covered a lot in a short time. Now you have both the plan and tools you need to create your first email template in Salesforce Lightning.
If you’re new to Salesforce, navigating the platform might be challenging at first. But don’t worry! Investing time and effort into learning it is worthwhile. As a marketer, creating visually appealing emails effortlessly is crucial. For a complete guide to mastering Salesforce Marketing Cloud, we’re here to help you every step of the way.


