After you’ve successfully created and deployed your Agentforce Service Agent on an Experience Site or any other platform, you may want to escalate the chat to a live support agent when needed. This blog post will guide you step-by-step on how to set this up in your Salesforce org.
Table of Contents
ToggleStep 1: Verify Agentforce Service Agent is Working
Make sure that your Agentforce Service Agent is visible and functioning correctly on the deployed platform (Experience Site, etc.).
Step 2: Assign Permissions to Live Agent Users
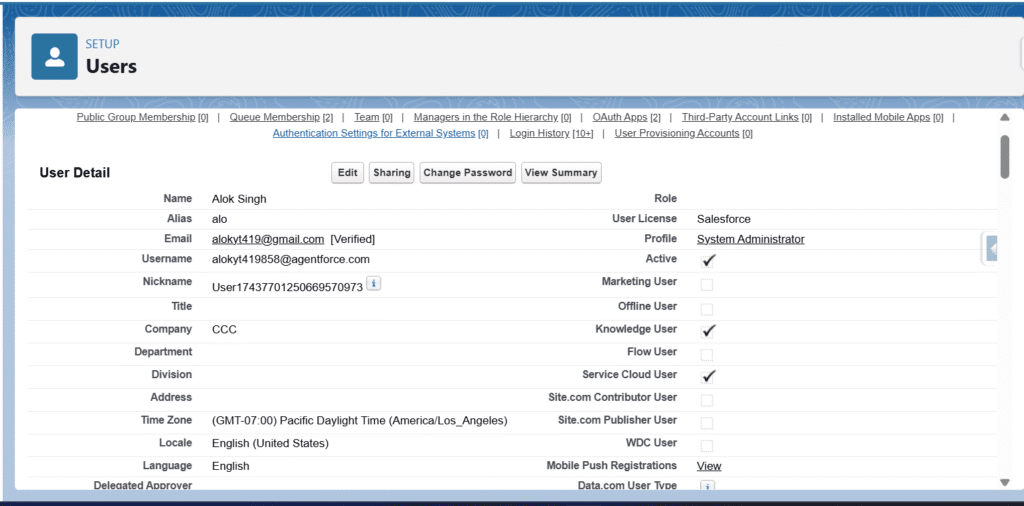
For any user who should act as a live support agent, ensure that the Service Cloud User checkbox is enabled.
Steps:
- Go to Setup → Users
- Open the specific user record
- Check the Service Cloud User checkbox

💡 Note:
To route all work items (except voice calls), go to Omni-Channel Settings under Setup and enable:
- ✅ Enable Skills-Based Routing
- ✅ Enable Direct-to-Agent Routing
Without enabling this, chat escalations to specific agents won’t work.
Step 3: Create an Omni-Channel Flow
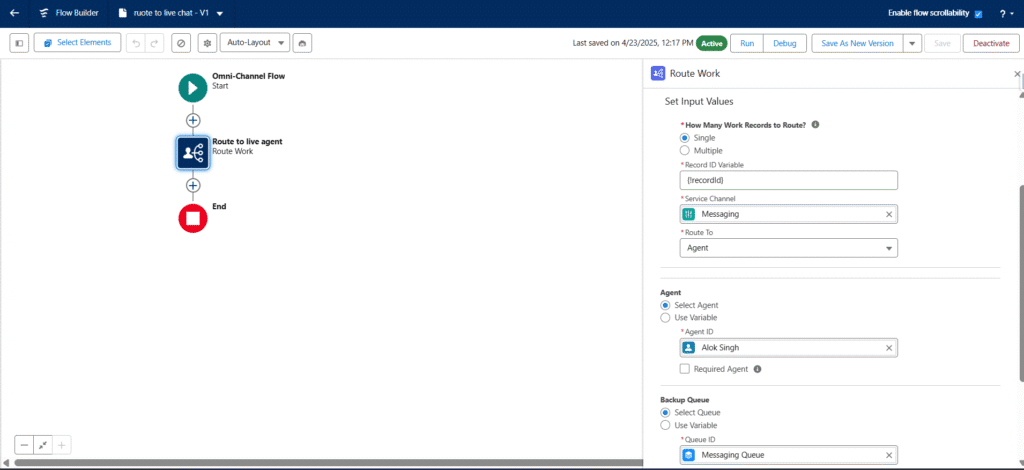
This flow is required to route chat escalations directly to a live agent.
Steps:
- Go to Setup → Flows → New Flow
- Choose Record-Triggered Flow or Auto-Launched Flow (depending on use case)
- Drag the Route Work action onto the canvas
- Configure the action:
- Label: Route to Live Agent
- API Name: Route_to_Live_Agent
- Record ID: Set it to the
recordIdvariable - Route To: Agent
- Agent: Choose one:
- Select Agent: Manually select the agent
- Use Variable: Use a variable (e.g.,
Preferred_Agent__c) linked to a Contact record
- To assign work only to a preferred agent, check Required Agent
- Optionally, define a backup queue by unchecking Required Agent and selecting a queue

Step 4: Connect Flow to Agentforce Agent
Open your Agentforce Service Agent in Experience Builder:
- Go to the Connections tab
- In the Outbound Flow, select the Omni-Channel Flow you created

Step 5: Add Escalation Topic
- In the Agentforce Service Agent configuration, add a Standard Topic named
Escalation - Activate the agent after saving the changes
Step 6: Grant Presence Status Access
Enable Presence Status for the system administrator or any user profile involved.
Steps:
- Go to Setup → Profiles → System Administrator
- Click Enabled Service Presence Status Access
- Select the Presence Status you want to assign
Step 7: Add Omni-Channel to Service Console
Add Omni-Channel as a utility item in the Service Console app.
Steps:
- Go to Setup → App Manager
- Find and Edit the Service Console App
- Under Utility Items, click Add Utility Item → Omni-Channel
- Save changes
- Ensure the System Administrator profile is assigned to this app
Step 8: Verify Omni-Channel Setup
- Open the Service Console App
- Confirm that the Omni-Channel widget is available
Step 9: Make Omni-Channel Available
- In the Omni-Channel widget, make yourself Available using the presence status assigned earlier
Step 10: Test Escalation on Experience Site
- Visit your Experience Site where the Agentforce Service Agent is deployed
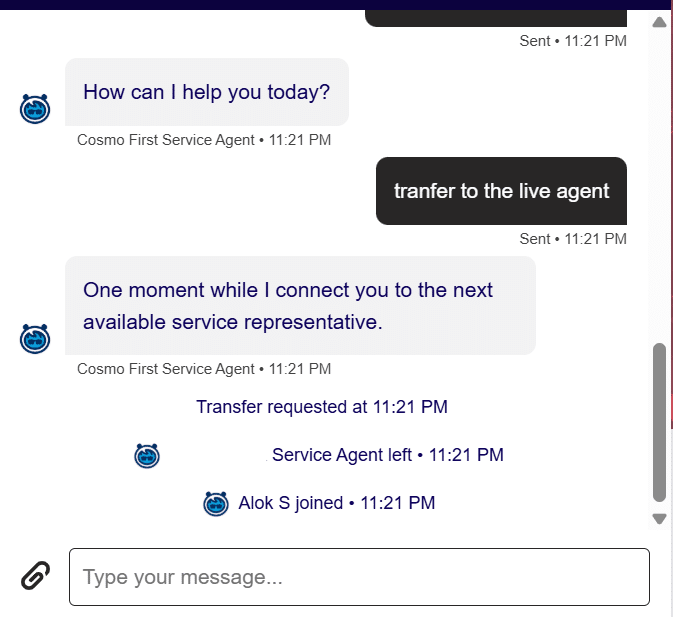
- Initiate a conversation and then type:
escalateortransfer chat to agentor similar to these.
Once you do this, the system will escalate the chat to a live agent using the routing flow you’ve configured. As soon as a live agent joins, the conversation will continue seamlessly.

Conclusion
That’s it! You’ve now successfully enabled chat escalation from Agentforce Service Agent to a Live Support Agent using Salesforce Omni-Channel and Flows. This setup allows for smooth handoff from Agentforce Service Agent to human agent, ensuring better support experiences for your users.
You can deepen your understanding of Data Cloud by exploring our comprehensive course on Salesforce Data Cloud and Agentforce – Building Agents and also check out our latest blogs on our websites for additional knowledge about salesforce.


